

So the basic gist of it is that I was sent a kit with everything you need to complete your foil manicure. Currently, the kits (of which there are several) are 50% off for $37 - I've also got a discount code which I've included for you at the end of this review. Each of the foil rolls can do about 60 manicures which is pretty awesome and makes it good value.

The box itself and flyers

What's in the box?
Nail sticks
6 x foil design rolls
Nail glue

Included foils
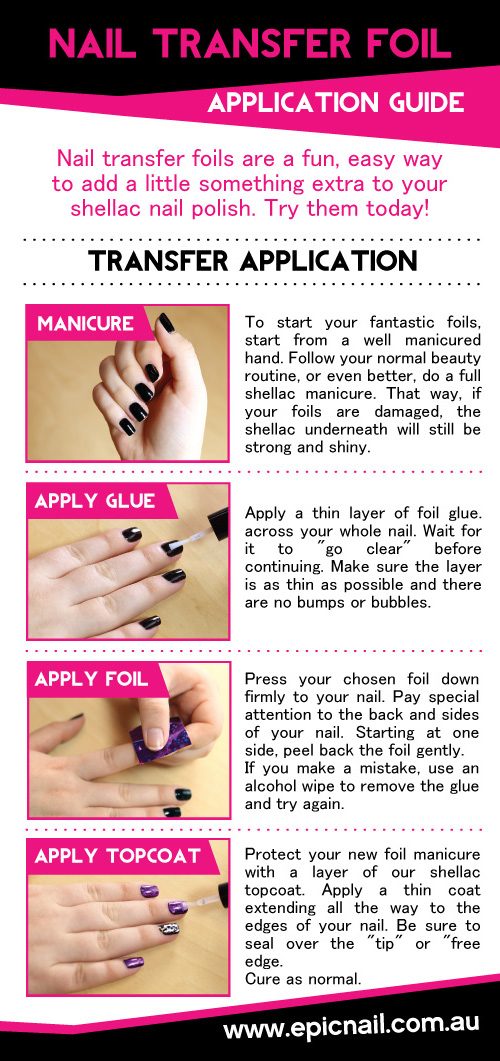
There were a few instruction flyers on how to apply. I've included a photo (taken from the website) of the one that I used to do my nails.
To be honest, I think this guide is a little lacking. I followed these steps, and the first time - I completely failed at it. No one told me not to use Seche Vite...it makes the glue not stick properly. So I'd suggest skipping the topcoat when you do the first step.
After watching a few YouTube videos, I discovered some useful tips. The foil should stick to the nail pretty much instantly and not require too much smoothing down.
Let me show you my results, in order of attempts....
Okay, so these are the first three designs I tried out. Will they look as good as they do in the picture below?

Adapted from Epic Nail website
Attempt 1: I painted my nails with OPI 'Koala-berry' and did not use a top coat prior to foiling. I let the glue dry and then proceeded to stick on the foils...

Not too bad, there are some bald spots but I think it looks pretty cool.
Attempt number 2: I painted my nails with Chanel's 'Black Satin' and tried out the lace foils.

I think I should have opted for a different coloured background, but still happy with the results! I initially did use a silver polish (Revlon's 'Sequin') but the grainy texture doesn't agree with the foils.
Attempt 3: SUCCESS! I didn't paint my nails with anything except a base coat, then used a very thin layer of glue...

How awesome does that look?!
So after some trial and error, I was finally successful. They're a quick and easy way to do a funky nail design without needing a lot of skill or patience. I think these kits make a great gift idea for nail savvy friends/family, and why not grab one as a Christmas gift while they're on sale?
Now, for purchases over $30, you're eligible to use my DISCOUNT CODE to get free shipping! Just use the code: BLOGPRETTY prior to checking out. This code is available until the 31st of December.
Do you use nail foils?
*product was provided for consideration and has been reviewed in accordance with my disclosure policy.
These are really cute! I think they'd make a fun gift for people for Christmas too :)
ReplyDeleteI haven't ever been very successful at nail wrap but you did so well!
Sarah | More Than Adored
Thanks Sarah :) I'm eyeing off some holographic foils now because I think they'll be a really awesome (and quick) mani to do for parties!
DeleteThey are super cute! I think i might check them out to add to my Christmas gifts for my friends!
ReplyDeleteI know one who would love to try these out!
Awesome! They'd be great for anyone whos just starting to get into nail designs I think.
DeleteGreat post Sarah! You had more luck than me...I suck at these!! Your nails look fab xx
ReplyDeleteThanks Sarah :)
DeleteJeepers! Epic indeed! The lace pattern's my favourite out of all of them!
ReplyDeleteThe lace is really nice! I'll have to give it another go now that I'm a bit better at it :)
DeleteThey look really awesome! x x
ReplyDeletezoetrope2468.com
I know right :D I think I might try the stripey one next time
DeleteThese look so good! Absolutely love the lace ones but I think they'd definitely take trial and error to get it right since they dont come precut and shaped as say the Sally Hansen ones! But they look like fun to apply!
ReplyDeleteYeah they are a bit tricky, but its good because it can be used for all sorts of different nail shapes/sizes. Its strangely satisfying to peel off the clear foil after the design sticks to your nail :P
DeleteWe got the same kit girl =) I haven't tried the animal print design yet. It turned out awesome for you. My tip is to let the glue dry at least for 2 minutes before placing the foil on top. I end up with a much better result. =)
ReplyDeleteP.S. I'm totes loving your long nails =)
Great tip - I think it took me quite a while to figure that out haha. Thanks :D
DeleteThese look so cool!!:)never tried these before!:)
ReplyDeleteThanks lovely!! Definitely try out foils if you get the chance :)
Delete