Wednesday 31 July 2013

NOTD + instructions!

The great thing about nail art is that sometimes the design itself is super simple when broken down into a series of steps. I decided to try out a leopard print design today, the best thing about it is that you don't really need to be that neat - if you're a little messy, it doesn't detract from the overall effect!

I usually paint my nails while randomly surfing the web...as a result, my laptop is a little bit colourful, but hey, that gives it character ;)


I started off by painting my nails two different colours, the magenta is Essie 'Big Spender' and the gold is Revlon 'Gold Coin'


Using the opposite colour, I used the end of the nail polish brush to make dots of varying sizes on my nails - don't worry about being neat!


Using the tip of a bobby pin (pictured behind) and a black polish, I drew two solid lines to outline the dots - you can see I haven't connected them. 

And that's it, super simple huh? I am really loving this colour combo! I will definitely try this out with different colours next time :)


All done!

Have you tried leopard print nails before? What do you think?

Colours of the Rainbow tag

After seeing Jasmine's version of this tag, I really wanted to give it a go!

I decided that because I have such a huge nail polish collection, I would include mostly nail polishes. 


Red
MAC Ruby Woo
About as red as you can get :)

Orange
Rimmel Apricot Punch
This polish is such a nice colour and it smells like apricots when it dries :) its probably the only orange toned polish I can get away with.

Yellow
Herbal Essences Honey I'm Strong shampoo
I've been loving this shampoo this winter. It smells like honey and apricots and its soo creamy.


Green 
Kleancolor 'Pearl Jungle'
This is a really pretty colour, but that's all I can say really - wear time is not very good at all! 

Blue 
OPI Liquid Sand 'Get Your Number' 
I'm wearing this right now and I'm not sure I like it that much. I think I'll stick to regular OPI polishes!

Indigo
Tigi Catwalk Fast Fixx (centre)
Sorry, the top is cut off - anyway, this is a nice smelling spray that I use to tame frizzies.

Violet
Ulta3 Spring Break
I love this colour, but it does need several coats for opacity.

Pink
OPI Strawberry Margarita. 
My first ever OPI polish, I love it! It's such a vibrant hot pink.

Multicoloured
Face of Australia Glitterati 'Saturday Night'
This looks amazing layered on top of a dark polish but be prepared to spend ages trying to get it off. 

What products would you use for this tag? Feel free to link me to your version of this post!

Friday 26 July 2013

Veet waxing review

If you haven't heard of Veet, then I'll just give you a brief overview - they have a number of different hair removal products, mostly focusing around waxing. There are so many different methods of hair removal for different parts of the body, sometimes its overwhelming. As for me, I epilate my legs and underarms, shave my knees (because its hard to epilate around my knobbly knees), pluck my brows and use depilatory cream on my moustache. While these methods work okay for me, they all seem to have drawbacks...ingrown hairs, redness and shaving cuts. When I was asked to try out a few Veet waxing products, I was quite keen to give it a try.


Left: Veet Facial Waxing Kit*
Right: Veet EasyGrip Ready-to-Use Wax strips*

First up, we have the Veet EasyGrip Ready-to-Use wax strips for sensitive skin. I have used waxing strips in the past (not this particular range) and I actually did like them, until I bought an epilator. With waxing, its an ongoing cost because you  have to keep buying strips, whereas an epilator is a one-off cost. 


Veet EasyGrip Ready-to-Use Wax strips comes with 20 wax strips (right) and 4 oil based finish wipes (centre). I really liked how quick and easy this was to use! Great results too.

These are super simple and quick to use. All you do is stick them on, rub the strip to warm it up and rip it off. I used these on my hairy man legs (I need leg hair to keep warm in winter, okay!) and the strips were quite hairy after - so I know they've done a good job. Each strip is good for about 2-3 uses until the stickiness wears off. The kit also comes with some oil wipes to help you remove the sticky wax residue that is left over. Even with the wipes, you'll need considerable effort to get the sticky stuff off! 

A week after waxing, I've got stubbly growth on my legs, but this happens regardless of whichever hair removal method I use. When summer rolls around, I'll definitely pick some more of this because its so much quicker than epilating. I did use an epilator to eliminate leftover stray hairs though. 

Now for the facial hair removal kit. It comes with a small tube of clear wax (it looks kind of like a lipgloss tube!), a pointy stick and some paper-tissue like strips. The instructions seem simple enough, put the wax tube in a glass of warm water for one minute, apply a thin layer of wax + stick strip on top and rip off. I found that I needed to leave the tube in hot water for a lot longer than a minute, probably closer to 10 minutes. Then you squeeze out some wax and spread it thinly over the area you want to wax (I tried this on my upper lip). I used the tip to spread it out over the area, but it felt more like I was dragging it over my skin because the wax is quite sticky. I smoothed on a strip and then ripped it off. 

First attempt? Not so successful, I had trouble picking up any hairs. But I soldiered on...

On later attempts, I probably picked up about 4-5 hairs. I found that I didn't have much luck with this but thats probably got a lot to do with my technique - I'm new to facial waxing so perhaps I wasn't doing it right. I did follow the instructions though. I tried about 5 times before I decided to stop because my skin was turning quite red. Clean up is super simple though, the wax is water washable so its really easy to clean the skin. The strips are reusable too and there are 20 strips in the set so you really shouldn't run out of strips. 

Verdict? Seems like a good product, but perhaps for those who are regular facial waxers. 

I experienced no irritating, itching or burning while using these products or afterwards, so I agree with the claim that it will be fine for sensitive skin.

Have you tried any Veet waxing products? What are your thoughts?

*these products were sent to me for my consideration. This has not affected my review in any way. This review is in compliance with my disclosure policy.

Seasonal makeup: blush and lipstick

I was thinking the other day how I've totally neglected some of my blushes and lippies, particularly the warmer bronze/apricot colours. I thought I'd show you what kind of colours I tend to wear in winter as opposed to summer...


DAYTIME BLUSHES
TOP ROW: WINTER 
Savvy by DB blush in Rose
Arbonne blush in Blossom*

BOTTOM ROW: SUMMER
NARS blush in Luster
Sleek blush in Rose Gold 

 Left: Winter blushes - Savvy by DB in Rose, Arbonne blush in Blossom
Right: Summer blushes:NARS Luster  (3rd swatch), Sleek Rose Gold (4th swatch) 

During winter, I definitely wear more pink toned colours. I prefer a sunkissed glow in summer, if I did that in winter, you'd be able to tell I was cheating!

 NIGHT BLUSHES
TOP: WINTER
MAC Beauty Powder Blush in Feeling
Elf Studio Blush in Berry Merry

BOTTOM: SUMMER
MAC Powder blush in Margin
Sleek Blush in Sunrise

Left: Winter blushes - MAC Feeling & Elf Berry Merry
Right:  MAC Margin (3rd swatch) and Sleek Sunrise (4th swatch)

In winter, I opt for purpley toned blushes whereas in summer, I go with bronzey/browns.


NIGHT LIPSTICKS
LEFT: SUMMER
Savvy by DB lipstick in Sugar Rose
Revlon Colorburst lipstick in Rosy Nude

RIGHT: WINTER
Revlon Colorburst lipstick in Soft Rose
Arbonne lipstick in Jam*

Left: Summer lipsticks - Savvy Sugar Rose, Revlon Rosy Nude
Right: Winter - Revlon Soft Rose, Arbonne Jam

To be honest, I don't think  night time lipsticks really change for me between seasons - it depends on my outfit, where I'm going etc...anyway, I haven't included day lipsticks because I don't find much variation between seasons, but if you're curious, check out my MLBB post!

As for foundations, I find myself wearing powder foundation and BB creams more in summer because it's too hot to wear anything heavier. In winter, I make use of my liquid foundations a lot more.

For me, my eye makeup doesn't vary much by season, but rather with my outfit and how creative/lazy I feel.

Does your makeup vary with seasons? What have you been wearing this winter?

* sent for consideration

Sunday 14 July 2013

My Illuminator collection

I've seen quite a few makeup collection posts lately, and I have to say, they are probably some of my favourite types of posts. I love having a peek into what others are using, and staring in awe at some huge collections. I've been wanting to do a collection post, but I buy things at such a rapid rate, the posts would quickly become outdated.

I decided on doing an illuminator collection post, because I don't buy these very often and my collection is fairly stable. So let's see what ones I own...


 L'Oreal Touch On Colour in Cashmere Rose
Face of Australia Mineral Therapy Illuminator in Angel Blush
Face of Australia Mineral Therapy Illuminator in Angel Glow
Face of Australia Mineral Therapy Illuminator in Angel Mist
Face of Australia Mineral Therapy Illuminator in Angel Flame
Benefit Girl Meets Pearl (travel size)

As above


 Swatched in same order as above

 Close up swatches
 L'Oreal Touch On Colour in Cashmere Rose
Face of Australia Mineral Therapy Illuminator in Angel Blush
Face of Australia Mineral Therapy Illuminator in Angel Glow

Close up swatches
 Face of Australia Mineral Therapy Illuminator in Angel Mist
Face of Australia Mineral Therapy Illuminator in Angel Flame
Benefit Girl Meets Pearl (travel size)

L'Oreal Touch On Colour in Cashmere Rose
I really like the texture of this one. It feels like a powder initially, but once you put a bit more force on your finger, it becomes a cream. It took me a few uses to actually work this out. This is an excellent highlight colour for my skin tone and was actually the first highlighter I bought. I think this may be discontinued, but I still see them floating around on eBay. 

Face of Australia Mineral Therapy Illuminator in Angel Blush
This was the first FOA illuminator I bought, and obviously I liked it because I went back and bought the rest...oops. This is my favourite of the four, its a gorgeous light pink with shimmer. You can see in the photo that I've got them upside down...that is how I choose to store them, storing them the right way (lid down) makes it really messy when you unscrew the lid, it ends up everywhere. I've done a post on this and a few others, which you can read here

Face of Australia Mineral Therapy Illuminator in Angel Glow
I don't use this as an illuminator, but it works quite well as a bronzer. I haven't touched it this winter, because I avoid bronzer in winter.

Face of Australia Mineral Therapy Illuminator in Angel Mist
This one is really pretty, but I can only use a tiny little bit. I think the white/silvery undertones probably aren't the best match for my skin tone, so I have to be careful not to overdo it. I find this one can be a bit difficult to blend in (as in, you can see where it has been applied), but its not a huge issue.

Face of Australia Mineral Therapy Illuminator in Angel Flame
I feel like this colour should be a cream blush or something. This one is the most shimmery of the lot, so as much as I would love to use it a blush, I have to be careful. 

Benefit Girl Meets Pearl (travel size)
I first saw this swatched on Sarah's blog, on her highlighter collection post and I loved how pretty it looked, a unique pinky-gold colour. I chose to buy a travel size, because I'm pretty sure I'll never be able to finish a full sized illuminator anyway! (unless I want to coat myself in it and be an Edward Cullen groupie). This looks super flattering with a pink blush. 

Have you got any of these illuminators? What are your favourite illuminators/highlighters?


Thursday 11 July 2013

Batiste's New Cherry scented dry shampoo

If there's one thing I could never go without, its dry shampoo! I've tried a few different brands, but I definitely liked Batiste the most. So after I was asked to be part of the Batiste campaign to celebrate the arrival of their newest scent, cherry, I was super excited. 

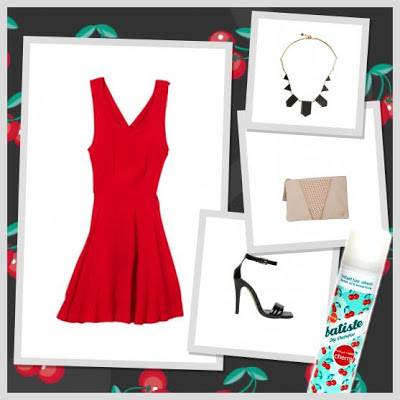
Using the Batiste fashion styling app on Facebook, I've created a fashion look which I'm going to share with you. If you want to style your own look, feel free to! You'll be in the running to win one of two $1000 Market HQ wardrobes! 

Here is the link: http://bit.ly/batistecherry

The finished look!

A red dress because red is so universally flattering (I think so, anyway!) and it's such a bright pop of colour, perfect for a night out, dinner with friends or a hot date. A black necklace to emphasise the décolletage, making it a focal point of the outfit and to add some character, a cute pair of black heels (because we don't want to start clashing our colours here) and to finish off the look, a simple but pretty cream clutch.

But wait, we're not quite done...

The brand new Batiste cherry scented dry shampoo*! How pretty is the can?

Let's not forget to spritz some dry shampoo through our hair before heading out. This dry shampoo smells so deliciously fruity, good enough to be used as body spray! It works well and super quick, without leaving the dreaded white powder residue (I would know, I have jet black hair!). I also love how the smell does last a little while, giving me refreshed and pretty smelling hair. Perfect for a busy (or lazy?) lady, and it's great for those who don't shampoo their hair every night. I only shampoo twice a week so this is a saviour for those days when my hair is looking more greasy than glossy.

What do you think about the new cherry scented dry shampoo from Batiste? If you want to  join in on the fun of their new campaign, click here and style your own look to be in the running to win a new wardrobe! 

Enjoy, and best of luck! xx

*this product was kindly provided for my consideration and follows the guidelines outlined in my disclosure policy. 

Friday 5 July 2013

Clearasil Vitamins & Extracts Scrub

I was asked if I would like to trial the Clearasil Vitamin & Extracts Scrub* (a facial cleanser) and I was pretty excited - having previously tried the face wash in the new Vitamins & Extracts range and finding it to be a skin care gem, I definitely had to give the scrub a go. 


What it claims: 'cleanses and exfoliates to keep skin clear...using a balance of effective cleansing and kind to skin ingredients'

As I have already mentioned, I have used the face wash and I really liked it. As for the scrub, the same holds true. It comes in a handy upside-down tube, as you can see above, which I think is the best form of packaging for skin care because it means you can get a lot more out of it!

Squeezed out a small amount of the scrub

The scrub itself has an interesting consistency - it actually reminds me of toothpaste, but not in a bad way. I like that it doesn't contain too many exfoliating beads because I honestly don't like the feeling of scrubbing sand all over my face. The beads are good because they aren't too abrasive but still feel like they can scrub off dead skin without leaving your skin red raw. I wet my face with water, then apply the scrub to my face and wash off after a few minutes (usually in the shower). Fresh, smooth skin!

And the smell! I love love LOVE the way it smells, its hard to explain but it smells a bit like apples. I want to eat it, but luckily I can read and have read the 'for external use only' warning ;)

After washing off, I find that my skin feels smooth and fresh, and not dried out at all. The way I test if my skin has been dried out by a product is to smile, if my skin feels tight then this is no good. Luckily, this doesn't happen with the scrub!

I then apply moisturiser, either a daytime one or a heavier night cream. I've been using this once a day, usually in the morning, and I've found that my skin is looking really clear and smooth. I can even skip wearing foundation/powder on my face which is a huge bonus!

Have you tried this scrub? Does it sound like something you would be interested in using?

For more information about Clearasil products, have a look at the following links:

http://www.clearasil.com.au/skin-care-guide.php
http://www.clearasil.com.au/washes

*this product was kindly provided for my consideration. It has been reviewed in accordance with my disclosure policy and is completely honest.

Thursday 4 July 2013

Turning 21

I've been umming and aahing about whether I should actually write this post or not. I haven't really written a personal post before. Anyway, I turned 21 about a month ago and it was a fantastic experience - if only I could turn 21 more often!

This will be a picture heavy post about my birthday party and the gifts I received. Also, as another first, I'm going to include some pictures of myself. I've never done that before on my blog, so I'm quite nervous!

(if you follow me on instagram chocolate_squeeze then you'll see some of the same photos here, sorry!)

Soo I had my party before I actually turned 21 due to various reasons. Here's a snap of my hair and makeup done (by myself, of course!), before I threw the dress on!

I'm not sure what that dark shadow on my neck is...maybe from where I was holding my phone!
What's on my face?
Face of Australia primer
Pure Cosmetics mineral foundation
MAC Beauty Powder Blush in Feeling
Maybelline New York Colour Tattoo in Bad to the Bronze
Maybelline New York Master Precise Liner in Black
Ardell Demi Wispies
Arbonne lipstick in Jam

Party accessories

Setting up for my party

I had a photographer at my party, so I thought I'd throw in a few party snaps. The theme was dress to impress...

My two boyfriends. (not really, just the one in the middle)

 My dress was covered in sequins! I bought it off Asos.

 I took a bunch of random props which were a great idea - some photos came out looking really funny! (LOVE the glasses!)

 This is my...sober face?

My gal pals from high school!

Birthday haul! 
Obligatory birthday alcohol, some jewellery, nail polish, wallet, clutch, wine glasses and random bits and bobs...that grey thing at the front is a brain cell - a gift from a friend who I did my bachelors degree with, I thought it was very clever!

Anndd a shiny new Toyota Yaris, courtesy of my parents! She is a bright red beauty. I've had her for a week now and everything is going well. 

Phew. I hope you enjoyed this photo heavy post, a little insight into something about me that isn't so much beauty related. Plus, now you can see what I look like! Do you think I should do more personal posts in the future? 

Wednesday 3 July 2013

May + June empties

I held off writing a May empties post last month, because I didn't feel I used up enough things. So I'm going to do a combined empties post. Where is time going? I feel like the last two months have sped by in the blink of an eye...

L-R
Coles Nail Polish Remover
Neutrogena Pink Grapefruit Foaming scrub (sample sized)
Garnier Ultra Dry Roll On

Coles nail polish remover
This appears every 2-3 months in my empties so I haven't got much more to say about it, just that it's still the cheapest I can find and does the job. Repurchased.

Neutrogena grapefruit scrub
I really liked this scrub. It's a pale pink gel scrub with small grains in it (not too abrasive) that cleanse the skin really well. It smells quite nice too. This sample lasted me about 3 weeks, using it once a day. I think I will consider purchasing this when I have exhausted all of my current skin care.

Garnier Ultra Dry Roll On
This particular version of their mineral deodorants is awful. It smells powdery and leaves a powdery residue behind. It probably does last 48 hours but I had to wash it off as soon as I was home/not busy because it smelt weird and the powder made me itch. I was only able to use half of this up because I disliked it too much. I won't repurchase this particular type, but their other ones are good. 


MUA False Lashes - Sassy
1000 Hour Fashion Lashes - Daring Black

MUA False Lashes
These were very fake indeed, they felt like plastic and were not comfortable to wear either. I think maybe because I purchased the super long ones is why they felt so annoying. The glue was pretty standard, did the job. I have only worn these twice, both times to costume parties and after seeing the photos - theres a distinct gap between my real lashes and the falsies :( even though I did apply them properly. They're cheap for a reason I suppose. Will not repurchase.

1000 Hour Lashes
I bought these from Price Attack and have worn them a few times - I always got lots of compliments! Application wasn't the easiest, but they looked amazing - dark and dramatic. Perfect for a night out or special event. The applicator for the glue was quite handy too. As for whether I would repurchase, I'm not sure...I've recently discovered Ardell lashes (helloooo demi wispies) which are 10x easier to apply and look incredible. Plus, they're super cheap too, I bought two pairs off ebay for about $2.50 each. So in summary, no I wouldn't repurchase, but not because they're a bad product.


Top - bottom
Covergirl eyeshadow trio
Nivea Fruity Shine in Strawberry
Lip Smacker in Cotton Candy
Sleek Volume & Curl mascara
Left: Seche Vite Dry Fast Top Coat

Covergirl eyeshadow
This is many years old, I actually found it when I cleaned out my drawers...yikes. I used to wear this when I was in high school and had no clue how to do makeup. I tend to avoid Covergirl products these days (with the exception of the clump crusher mascara) because they remind me of my clueless younger days!

Nivea lip balm
I am a huge fan of their lip balms. I looove anything strawberry scented so I'd probably buy this one again, once I've used up one of my 1000 other lip balms.

Lip Smacker
A fun reminder of being a kid really. This smells divine and I'd probably repurchase (in a different flavour) if I feel inspired one day.

Sleek Volume & Curl mascara
I've had this for a while now, but probably used it maybe...half a dozen times? It's just not that great, it doesn't do much for my lashes. Not repurchasing. 

What products are you chucking out this month?

Related Posts Plugin for WordPress, Blogger...